This how-to guide explains the process of connecting to RM Unify’s VPN, SSL Connect, which allows users to access their school network from any external location.
Before you start
Before proceeding, there is an important prerequisite that needs to be checked.
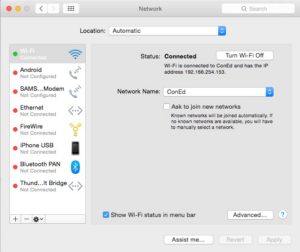
Prior to using the SSL connect, if you are using a school Ma, the proxy settings on the must be turned off. To achieve this, navigate to settings/preferences and select the ‘Network’ option until you see the below window appear.
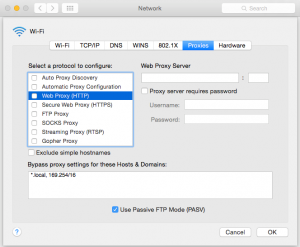
Select the ‘Advanced…’ option, click on ‘Web Proxy (HTTP)’ from the list, and remove any details which have been entered here – as seen below. Click ‘OK’.
After this requirement has been met, please continue to step 1.
Step 1
NOTE: For this step please use a browser other than Google Chrome – the latest version of Chrome is currently not compatible with the VPN software.
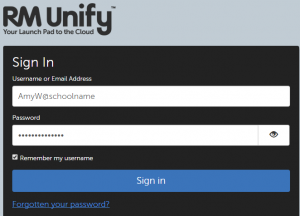
Navigate to ‘rmunify.com’, and enter the VPN login details provided by your school’s headteacher/office admin. The username must have @schoolname suffix as part of the username to sign in successfully. For example, your username may be “AmyW”, however the full VPN username is “AmyW@schoolname”. (@schoolname should be replaced with the name of your school’s RM account)
Step 2
As part of the initial sign in, there will be a prompt to enter a password recovery email address. It is advised that your school email address is used, so that you can easily reset the password if needed. Click the ‘Save’ button.

Step 3
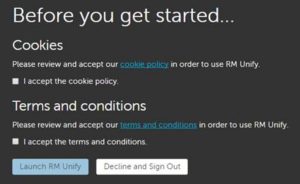
At this stage, you’ll be requested to accept RM’s cookie policy and terms and conditions. Select both tick boxes and click the ‘Launch RM Unify’ option.
Step 4
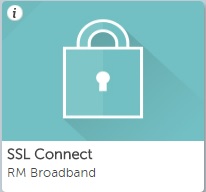
Once logged in, you will be presented with a dashboard. Click on the ‘SSL Connect’ option, as seen below.
Step 5
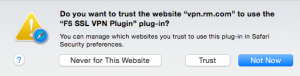
At this stage, you may be prompted to specify whether you would like to trust ‘vpn.rm.com’ to use the ‘F5 SSL VPN Plugin’. Click on the ‘trust’ button.
Step 6
The browser plugin will need to be installed, by clicking on the ‘click here’ option as seen below.
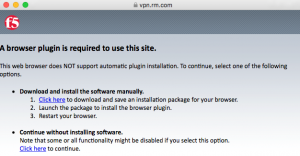
The installation package will then be downloaded, which can be opened by clicking on the downloads icon.

Once opened, click the ‘continue’ button until the installation is complete.

Step 7
At this stage, it is necessary for Safari (or whichever browser was used to install the plugin) to be completely closed and then re-opened, to ensure the plugin has been installed correctly.
Step 8
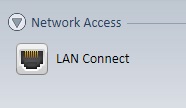
Log back into your RM Unify account, select the SSL connect option as before, and then click on the “LAN Connect” button in the top left corner.
Step 9
After this button has been clicked, the VPN will create a connection. Once connected, you can then use the remote desktop connection software to remote into the school network and use it as if you were working in school.
If you don’t have a remote desktop connection setup, install Microsoft’s ‘Remote Desktop Connection for Mac’ from the App Store and enter the IP address of the school server. Log in using the same username and password you use in school. If this you require assistance with this, please get in contact with Con Ed.
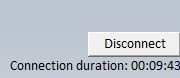
Step 10
After you’ve finished using the VPN, make sure to disconnect from the session by clicking on the ‘disconnect’ button or closing all browsers which will terminate the VPN connection.