27 years of trusted school IT support across Hertfordshire and Buckinghamshire

Author: admin

  • How to spot phishing emails

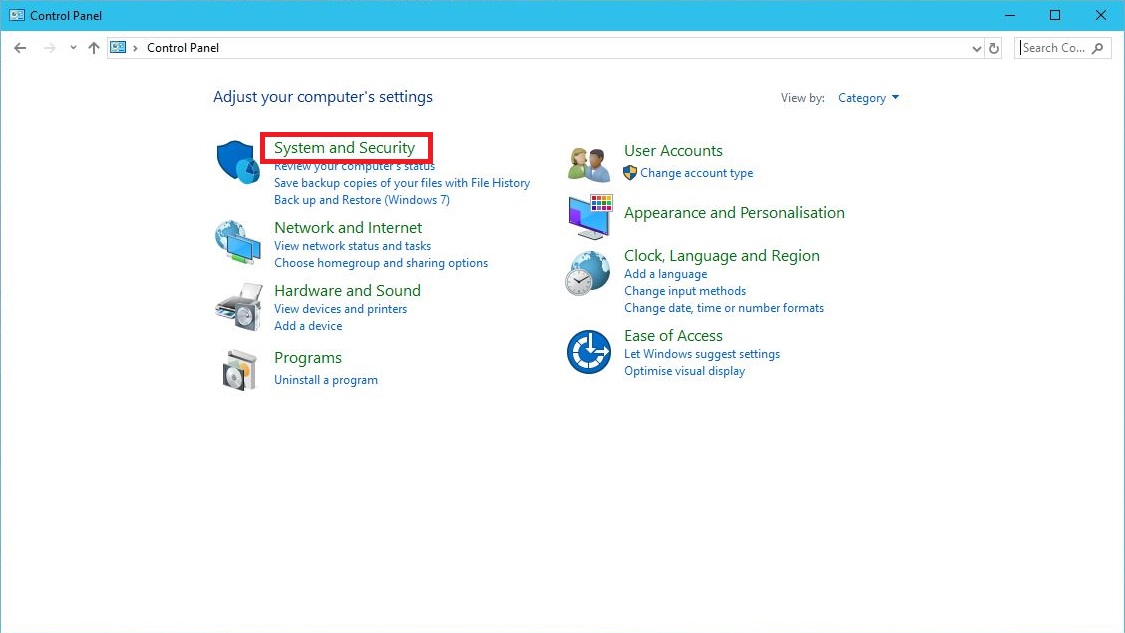
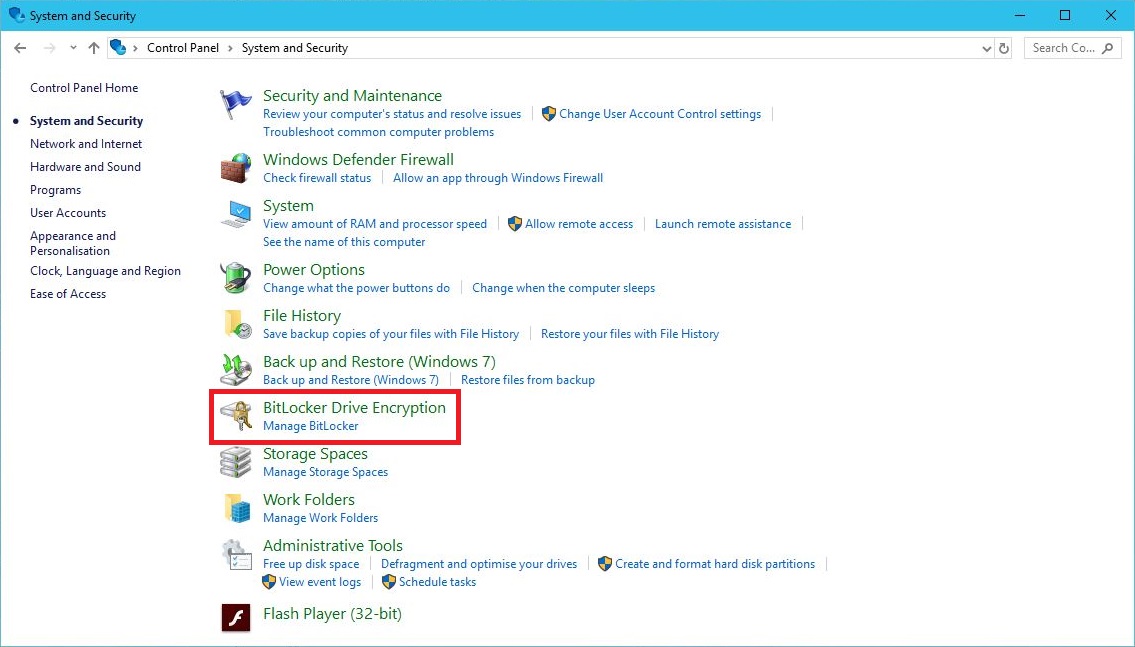
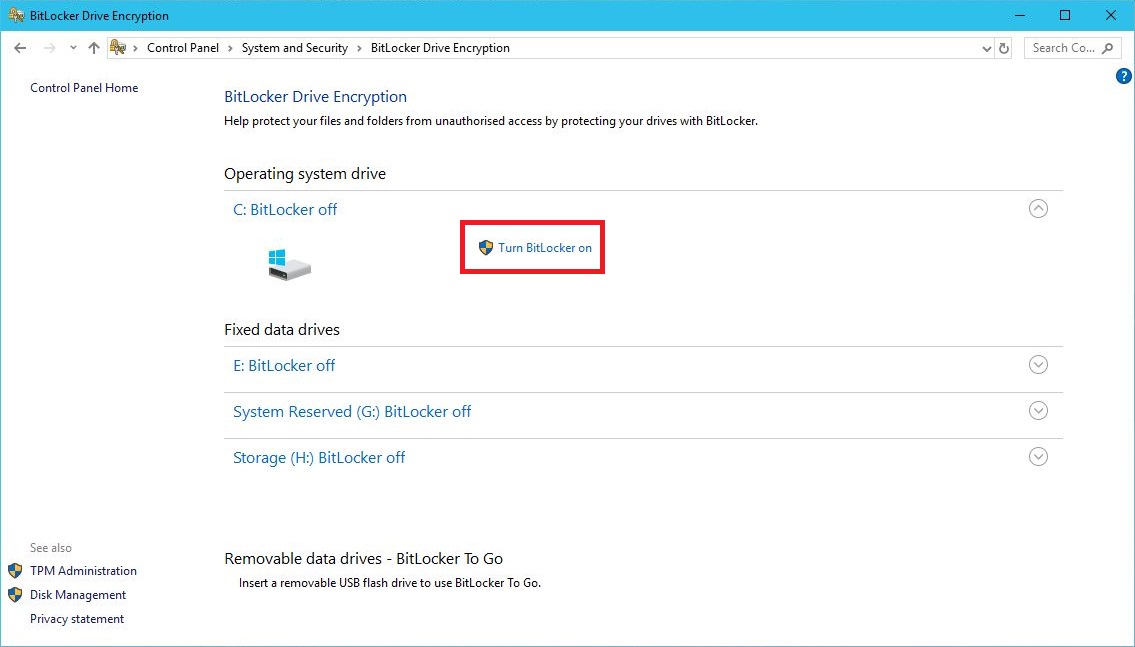
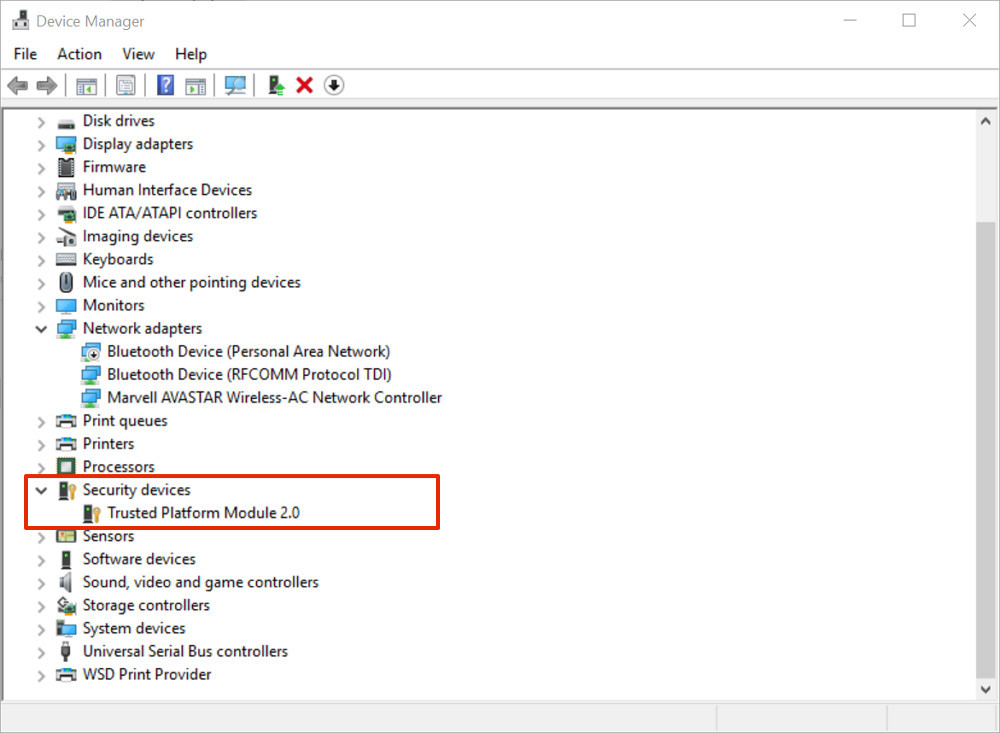
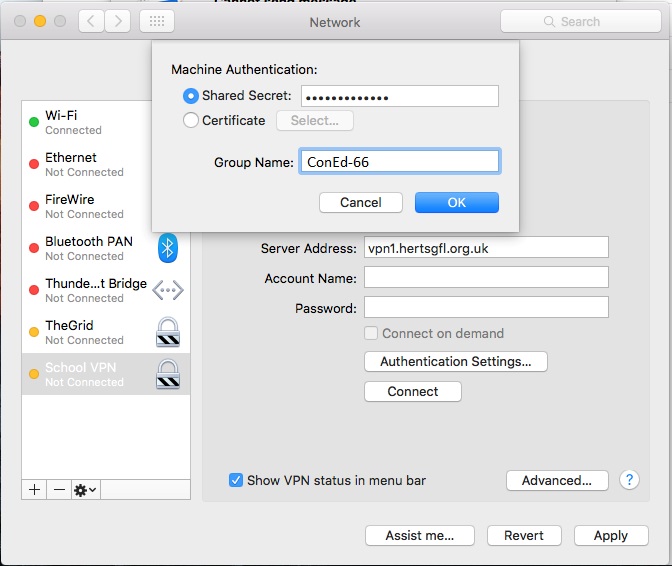
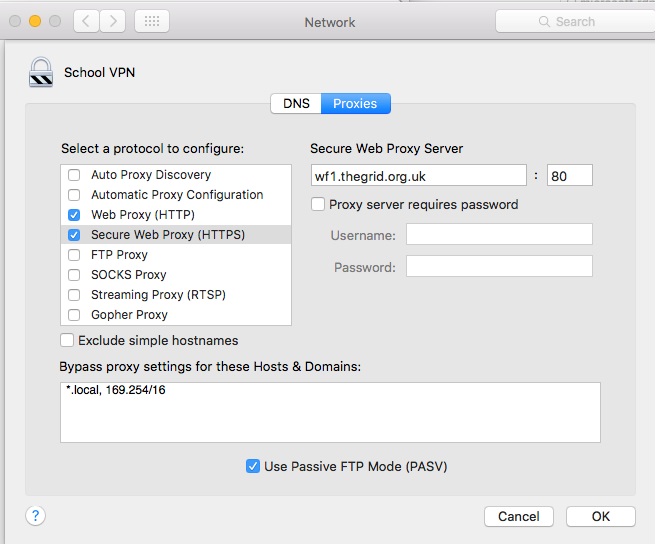
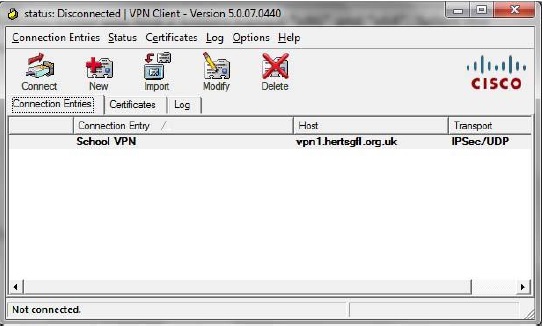
    Everyday, fraud organisations are sending phishing emails to all kinds of recipients, even to school staff members. Phishing refers to the aim of an email that tries to trick you into providing sensitive information. This could be login usernames and passwords, account numbers, or even confidential files. When it comes to protecting this kind of information, it is very important to be vigilant with each email you receive. We have created the mnemonic PEGASUS to help you to remember each of the steps to identifying a scam email. If you would like to download or print the graphic below, please click here.

    Work through the following steps and scammers won’t stand a chance!
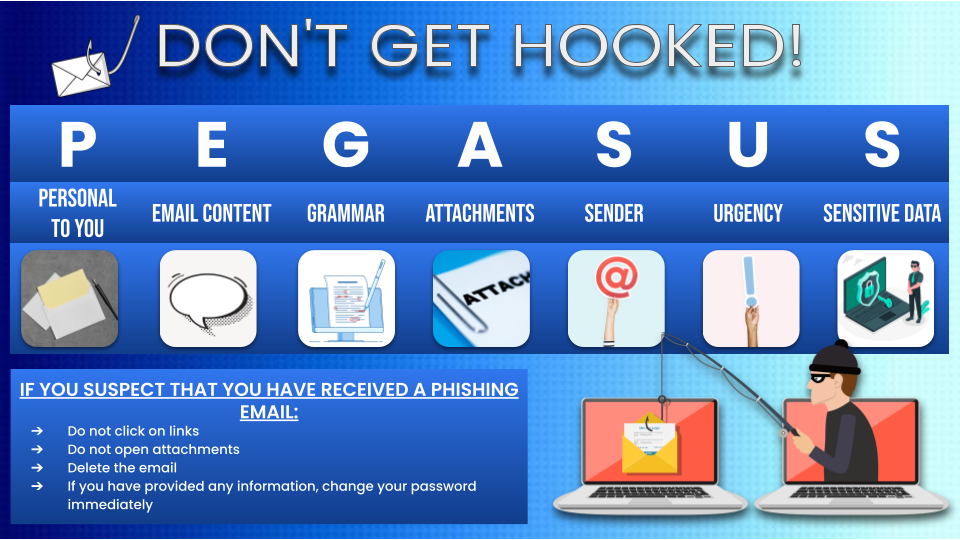
    Personal

    How personal does the email sound? If the sender addresses you with a generic title at the start of the email and continues to use non-specific language throughout, then this email might not be a legitimate message for you. Most phishing emails are sent in bulk to thousands of recipients at a time, so you should look for content that would make the email specific to you or your school. Look for references to previous conversations, to you, or to your school – if you don’t find any, then this could be the first sign of a phishing email. However, this is not a firm rule because if you are being targeted personally, then the scammer may have done some research to convince you that they are genuine. Check against the rest of these steps to be sure.

    Email Content

    Similarly to the previous point, it is important to check the body of the email for red flags. If the sender is making an offer that is too good to be true, this could highlight the email as a concern. If they mention an invoice for a product or service that doesn’t sound familiar, or if they claim to be from a company that you don’t normally have contact with, then there is a good chance that they are trying to get information from you illegitimately.

    Grammar

    Since the first days of email fraud, a giveaway has always been in the spelling and grammar in the email. Scammers from all over the world will send phishing emails to recipients in many countries and will not always be successful in writing the emails using the correct language. Despite the variety of translation, spellchecking and grammar-checking tools available, this is still an indication to be found in scam emails today, so is always good to notice.

    Attachments

    If you receive an email that seems suspicious, then it is very important that you do not open any attachments. Files attached to suspicious emails can be seriously dangerous once they have been downloaded or opened. Certain attachments will contain viruses capable of causing damage to your computer and files, while others will even spread and affect other devices across the school. Even if they look familiar, such as a PDF or Word document, they can still be harmful, so it is always better to be cautious and avoid clicking on any attachments that come with unusual looking emails.

    Sender

    Have a look at the sender address of the email. Depending on how you access your emails, it might be listed at the top of the email, or you may have to click on the sender name to see the address in full. Does it look long or complicated, or does it have a spelling mistake? If so, then it could be from a fake source. Even if the domain is spelled correctly, it may actually be different, by having extra words or symbols included, such as @facebook vs @face-book. Click on the sender to see the email address in full and make sure that the domain looks legitimate. If this is not the case, then it could be a scam. This is particularly important for recognising a scammer who is targeting you or the school personally. Most reputable organisations will use the same domain for both their emails and their website, which means that if the part after the @ symbol doesn’t match up with the website address you would normally use for a particular business, then it could be fraudulent.

    Urgency

    A trick that scammers use to get us to give up our details is by making us feel under pressure to provide the information quickly. This might be by threatening you or saying that your account will soon be locked, or that you urgently need to pay an invoice. This is a very common way to tell that the email might not be all it seems. Disarm the sender by taking a moment to carefully check the email against PEGASUS. It is always better to be safe, so don’t let the emails trick you!

    Sensitive Information

    The clearest way to tell that an email is illegitimate is by noticing what the sender is asking of you. If you are being asked for sensitive information, such as passwords, account numbers, or sensitive information, then it is likely to be from a harmful source. Reputable businesses go to great lengths to make sure that sensitive data such as banking information is requested securely and that you feel comfortable submitting it. If you are typing important information into a form that feels unfamiliar, unprofessional, or otherwise strange, then take the time to check the website address at the top of your browser. As before, if anything is spelled wrong, or is different from a website you would normally use, then don’t trust it. Don’t even type into the form, as some websites can collect the information you type even before you submit the form.

    What to do next

    If you suspect that you have received a phishing email, do not click on links, do not open attachments, delete the email and if you have provided any information, change your password immediately, or ask us to. We are happy to confirm any suspicious emails that you receive, although if you follow PEGASUS this won’t be necessary, and you can simply delete the email.

    It might seem like the simple task of checking your emails is fraught with danger, but most scam emails will give themselves away quite quickly. If you remember to be calm but cautious, then this article will have given you the tools that you need to protect your school and your files with confidence!

  • BitLocker Windows Security Feature

    What is BitLocker?

    BitLocker is a Microsoft official encryption program for Windows operating systems, it is used to protect the data on your storage devices (e.g. Hard Drives and USB Sticks).

    BitLocker will be able to detect if the drive has been tampered with, e.g. physically connected to a different machine, or an unauthorised change to the boot files. The data on the drive will be protected from being accessed without authorisation. To access the data, you will need to enter a password.

    How To Enable BitLocker via Control Panel

    System and Security

    BitLocker Drive Encrpytion

    Enable BitLocker

    Follow the on-screen wizard to finish encrypting your selected drive. During the process it will generate a decryption key, which needs to be kept safe and secure if the drive ever needs to be unlocked or decrypted. Please Backup the key to another device or the cloud, in the event the password is lost or forgotten.

    For additional information on how to setup Bitlocker, please follow this Guide:

    https://www.howtogeek.com/192894/how-to-set-up-bitlocker-encryption-on-windows

    Decrypting the Drive

    One flaw of BitLocker is not that of the program, but safeguarding the decryption key, making sure its stored in a safe place and possibly backed-up. When the machine’s hardware fails, or your looking to upgrade, the decryption key will be needed to access the data on the drive when it notices a change in hardware.

    If the decryption key has been lost, unfortunately you can no longer access the drive and it will have to be wiped for further use. There are various ways to save and backup your recovery decryption key.

    It is very important to secure and backup your decryption key.

    Thanks for Reading!

    BitLocker Uses TPM Encryption Devices (The Techy Bit)

    Once applied it will encrypt your selected drives to ensure the integrity of the boot path.

    If your system is compatible, you first may need to enable your ‘Trusted Platform Module’ or ‘TPM’ in the computers BIOS settings (this may already be turned on automatically). Once enabled, navigate to ‘Device Manager’ and under ‘Security devices’, ‘Trusted Platform Module’ will be active.

    BitLocker co-operates with TPM to generate the encryption key, in which is stored on the motherboard. This is how the storage device protects itself from booting on another machine without authorisation.

    Check BitLocker compatibility, BitLocker is compatible with TPM devices of 2.0 or Higher

  • Office365 on Android using OWA

    Office365 on Android using OWA

    Microsoft have now introduced an all-in-one app to access your Office365 mail, calendar and contacts. To install and set up on an Android device:

    1. Open the Play Store

    play store

    1. Search for “OWA”. You may see a few different versions, but we are interested in the “Outlook Web App” app.

    search

    install

    1. Download and install the app. Once it’s finished, open OWA.

    owa app

    1. When the app launches, click “continue”

    before you start

    1. Next, sign in with your school Office365 email account

    sign in 1

    1. After signing in initially, you’ll be redirected to the Office365 website to sign in once more to verify the account.

    sign in 2

    1. If the email credentials have been entered correctly, then the app should start contacting the server to load your account into the app.

    contacting

    1. Once successfully connected, your emails will start to sync.

    initialising

  • Office365 on iOS using OWA

    Microsoft have now introduced an all-in-one app to access your Office365 mail, calendar and contacts. To install and set up on an Android iOS device:

    1. Open the App Store

    app store

    1. Search for “OWA”. You may see a few different versions, but we are interested in the “OWA for iPhone” or “OWA for iPad” app depending on what kind of Apple device you are installing it on.

    search

    download

    1. Download and install the app. Once it’s finished, open OWA.

    owa app

    1. When the app launches, click “continue”

    initialise

    1. Next, sign in with your school Office365 email account

    sign in 1

    1. After signing in initially, you’ll be redirected to the Office365 website to sign in once more to verify the account.

    sign in 2

    1. If the email credentials have been entered correctly, then the app should start contacting the server to load your account into the app.

    contacting

    1. Once successfully connected, your emails will start to sync.

    sync

  • Why data privacy is so important for your school

    Above all else, schools should be happy, inclusive places that have a truly open, collaborative and community feel.

    But, it would be irresponsible not to recognise the importance of keeping school data private.

    Data privacy is a growing issue for schools, as education and research organisations are handling a greater amount of information, while at the same time being subject to a growing number of cyber hacks.

    Disclosure of information is one of the most common threats, and it’s vital that schools take steps to protect their data and that of every student.

    What are the threats to education data?

    With e-learning platforms, virtual classrooms and BYO devices becoming the norm, the way school data is stored, accessed and shared is constantly changing.

    While many of these advances are positive and make for a more collaborative and creative learning environment, there are also serious negatives that need to be recognised and addressed.

    Data privacy is a hot topic for the education industry as more and more cyberattacks occur.

    While the information schools store might look innocuous, it’s naive to assume that school data can’t be valuable to hackers.

    Student names, addresses, academic and health records, and more, are all stored on school networks. With paper records, in dusty filing cabinets, a thing of the past, all of this personally identifiable information (PII) is on the school network and vulnerable to hacks.

    In addition to phishing scams, that trick people into giving information, ransomware hacks are also on the rise. With students using their own devices, this type of infectious virus can more easily infiltrate a network if proper security standards aren’t used.

    Get to know your data

    It’s hard to protect something if you don’t know what that something is.

    Doing a data audit – that is, a data inventory and mapping of all the processes that collate and use/store student information – will give you a good base from where to start.

    Once you know the kind of data you have, you can start to discover platforms and IT vendor features that can help you better protect and use the information between staff and parents, or across your management networks.

    How to improve your school security

    The amount of data stored and used by schools can feel like an ocean of information. And how can something as small as a school protect something as large and ever-changing as an ocean?

    Don’t panic. There are some simple ways to help improve the way you secure and protect your school data.

    1. Talk to your people

    The weakest link in data security is people. Sad, but true. Equipping your staff, students and teachers with the basics, about how to stay safe and secure online, can be a great step in stopping things like phishing scams and ransomware attacks. Conduct regular sessions with leaders who can pass on the correct information, and let your teams be part of a safe data solution.

    2. Put policies down in writing

    Allow and encourage your IT decision makers to create a set of guidelines and policies, around devices and access, that everyone in the school can see and understand. As well as making specific departments or leaders accountable, it also acts as a handbook of what to do when suspicious external sources request information they shouldn’t need.

    3. Use a trusted IT vendor

    Sounds like common sense, but when employing a third party IT vendor or support service, ensure you’re using trusted, reputable, global brands. These internationally recognised organisations can offer you the security options you need, and know what requirements your school legally and practically requires.

  • Self Password Reset

    There are 2 parts to this article, please refer to part 2 if you have forgotten your password. This will only work if part 1 has been completed.

    Part 1. Update Your Information

    This service allows users to reset their own password for their school E-mail account. This service is not enabled by default.

    If your E-mail has been selected for Self Password Reset you will be prompted to add/update your recovery information.

    IMG1. This is prompted after logging in.

    Please choose atleast 1 method of recovery and select “Set it up now”. Follow the instructions and add your details.

    You can add more than 1 method.

    IMG2. Add at least 1 method of recovery before you are able to sign in.

    A verification code will be sent after adding the information, which will be needed to confirm the details.

    IMG3. Receiving your verification code via E-mail.

    Once you have added the information required on IMG2, Select “Finish”, which will no longer be greyed out, and will log you in.

    Part 2. Forgot your password?

    Follow this section if you have forgotten your password and the self password reset service has been set up.

    Click on “Forgotten my password”, this will take you to another page.

    IMG4. Click “Forgotten my password”

    In the “User ID” field, enter your school email address. Fill in the second field with the characters shown in the picture, or select the audio option to the right and enter the words that are spoken.

    IMG5. Enter your email address and the CAPTCHA characters.

    Choose your method of verification, you will need to access, to get the verification code.

    IMG6. Select your method of verification.

    IMG7. You will receive a verification code to enter

    Once you have received your verification code, go on your web browser and enter the code.

    Now enter a new password to use for your email account. The password will need to be different from previous passwords.

    IMG9. Updating your password.

    Now log in with your new password and start using your account.

    Thanks for Reading.

  • How to configure VPN on a Mac OSX

    VPN is a system that allows a user to connect to their organisation’s network from an external location. Essentially, it’s like running a really long network cable from the school back to your house – everything is encrypted making it safe and secure for use.

    To configure VPN on a Mac OSX, open Network Preferences, click on the + sign (plus sign) in bottom left corner to add a new connection.

    network1

    In the popup that appears, change the details to:

    • Interface: VPN
    • VPN Type: Cisco IPSEC
    • Service Name: School VPN

    vpn interface

    Click Create.

    You now need to enter the server address, which is vpn1.hertsgfl.org.uk and the account name, which is your personal VPN username. You will be asked to enter your password each time you connect.

    Click on Authentication Settings…

    You will need to get in touch with us to confirm the Shared Secret, and Group Name settings – they are both the same values. Once you have this, enter it in the appropriate boxes and click OK.

    group name

    When connected to VPN, it’s as though you are connected to your school network. Therefore you should also define the Proxy settings to be used while connected via VPN. To do this click on the Advanced… button and enter the following for both Web Proxy (HTTP) and Secure Web Proxy (HTTPS).

    proxy

    Click OK and make sure you click Apply to save the settings.

    That’s the VPN settings defined. If you now click connect, it will prompt you for you VPN credentials. Enter these and you are now successfully connected to the Herts VPN network.

    Once connected, the easiest method of working remotely is to use an RDP client. RDP is a Remote Desktop Protocol which allows you to connect to and remotely control a computer as though you were sitting right in front of it. We find the Microsoft one is best. You can install this from the app store. There will be a few oddities, such as the keyboard will be different and won’t have a right mouse button to click, but otherwise it’s a fairly stable platform to work from. Before proceeding, speak to us about setting up a machine at school for you to connect to – we will provide the details needed to set the RDP client as below.

    rdp

    When you first run the Microsoft Remote Desktop client, you will have to define a site. Click on the + sign (plus sign) and enter the following details. You can save the entry by pressing the cmd and W keys. (Or file > close)

    rdp setup

    • Connection name: give it a suitable name
    • PC name: This is the IP address of the machine you will connect to.
    • Username: This is your school computer username
    • Password: This is your school computer password

    Once the above details are in place, that’s it, now you are ready to remotely control your school machine. Connect to the School VPN network first (from Network Settings), then simply double click on the connection you have create in the RDP client. You will probably get a few security warnings, namely to Verify Certificate. Simply accept all warnings and continue.

    If all is well, this should connect and log you into the machine that’s been configured for RDP at school. Remember, that you can only have one person using this at a time. E.g. make sure no one in the school is using the computer when you want to connect and visa versa.

    Microsoft Remote Desktop Connection Keyboard Shortcuts

    • Two finger click = Windows right click
    • Cmd button = Windows “Windows button”

    When you are finished with VPN, to end the session either:

    • Log Out – Log off windows in the normal way (which logs off the remote machine you controlling)
    • Disconnect – Go to the top of the screen and from the Window box, choose Close Connection. (this will lock the remote computer, rather than logging off). The advantage with this method is that because the computer is only locked, if you connect again, you’ll carry on from where you left off.
  • How to install Cisco VPN Client

    NOTE: This guide is only applicable to Windows XP, Vista, 7 and 8. Windows 10 instructions will be uploaded shortly.

    VPN is a system that allows a user to connect to their organisation’s network from an external location. Essentially, it’s like running a really long network cable from the school back to your house – everything is encrypted making it safe and secure for use.

    If you are using VPN from a school laptop, then the chances are that we have already deployed the VPN client to your machine. In which case, follow this guide from step 4. If you are going to use VPN from a personal Windows device, then instructions for installation is as below:

    1) To install VPN on a personal device, first we need determine the type of system you have. Click Start > Computer > C drive (Local Disk).

    • If you see “Program Files” folder, you have an x86 system
    • If you see “Program Files” AND “Program Files (x86), you have an x64 system.

    2) Once you have determined the type of system you have, choose and download the appropriate installation file below:

    3) Once downloaded, right-click and extract the folder to any location. Navigate to the location where the folder has been extracted to, open the “vpnclient_setup” installation file. Accept all default settings. After the installation is complete restart your machine.

    4) Once the machine is restarted, open the VPN client (click Start > All Programs > Cisco Systems VPN Client > VPN ).

    vpn client

    5) Click Import. Now browse for the School VPN file which we have made available to you. If this has not been provided, please get in touch in the usual way.

    6) If you see School VPN listed in the client, it is now ready to use.

    client

    Exactly how you will now access your school documents will differ from school to school – ask us to find out the method adopted by your school.

  • Microsoft Forms for Education

    So just a little over a month ago, Microsoft released it’s latest app, Forms, into it’s ever-expanding array for the ‘Office365 for Education’ platform. MS Forms was developed as a result of feedback (via a form?!) from various educators who were looking for an easy way to collect simple data, produce quizzes and be able to analyse student progress. Initital impressions from users suggests that MS have delivered a neat product indeed!

    So let’s take a closer look. Forms is currently still in it’s infancy and hence it’s not yet been fully rolled out. Keep an eye on the “waffle” (that grid of tiny squares in the top corner of Office365) for it’s imminent release:

    waffle

    So until then, users with an education account for Office365 can access forms via it’s preview site: https://forms.office.com

    Once logged in, you are presented with a really clean and very intuitive interface.

    interface

    The design allows for forms/quizzes to be created very easily and within a matter of minutes. There are a few themes to choose from to personalise each form too. Forms can be restricted to either your organisation, or it can be made public. If it’s restricted to your organisation, then users must log into Office365 before they will be allowed to fill out the form. This of course means that the submissions will not be anonymous – though, results are only seen by the creator of the form. Conversely, if the form is set to be public, then users are able to fill in the form without having to log into Office365 and hence the submissions are completely anonymous.

    Forms can be sent to users via a URL, email, QR code or embedded into a website – all of these are auto-generated via the Form itself. Responses are seen instantly by the Forms’ creator, although at this stage there is no email notification to say a response has been received. Instead, the creator needs to log back into the Forms site to see the response. Forms also allows an Excel document to be created with the results. Very handy if users wish to create graphs with the results obtained.

    On the whole, it looks like a very good tool to have as part of the Office365 suite. I can definitely see many teachers adopting it as way of generating some really quick tests for their pupils.

    Although I’ve only had a very quick 30mins with this, there are 2 issues that jump out initially with a form set for public access:

    1. The lack of a Captcha feature – if the form is set to public, the lack of a Captcha will leave the form open to abuse.
    2. The method of tracking responses is via the number of answers, and not the number of users who have submitted.

    Just to illustrate that 2nd point a little further, here is an example.

    response 1

    Above, we can see 3 respondents. The first user “ICT Support” signed into Office365 before opening the form, hence they have no anonymity. The 2 subsequent submissions were done anonymously. One would think the “ID” column represents the order in which they submitted their form. I certainly did…partly because that’s the order I’d done the test submissions in! But then this happened:

    response 2

    Question 6 was optional, and only the 3rd user filled the answer in, yet, the ID is shown as 1 and not 3 (as I would have expected). If the ID was based on the user (and not the answer), this would allow tracking the “optional” responses more dynamically. So in this example, Mr Berry had filled out the optional question – if this ID was number 3, then all questions which had answers with ID 3 could have been collated together so that Mr Berry’s overall feedback could be discussed with him.

    If MS can sort these 2 little niggles then I think this would have been a very solid addition to Office365. My test form is at the bottom of this blog for anyone interested in what the embedded form looks like or wanted to have a play too. Anyone who submits the form will be added into the fictional prize draw to win the non-existent iPad mini, too! Good luck!

    https://forms.office.com/Pages/ResponsePage.aspx?id=KyJjVLIioEKrLkqtSEPbXmmhFOxRdbJFrDJljPodADJUNFZBMTJLNzRORDg2QUFMRUpYVlVWM01BNi4u&embed=true

  • How your IT system can help make your school secure and successful

    Anyone who has ever walked into a school – let alone works in one – would attest to the fact that schools are busy, busy places.

    Put aside the day-to-day demands of running a building that potentially houses hundreds or more children and educators, but the added weight of responsibility of teaching, management and organisation is simply mammoth.

    Aside from chaining the gates and locking the doors, school security might not always come at the top of the essential, daily To-Do list. But in the growing environment of cyber threats and attacks aimed at the education industry, it’s never been more vital to take the time and ensure you have an up-to-date IT system, that helps keep your school safe.

    Need convincing?

    Outdated systems are at risk

    Given the choice when taking a flight, would you choose a brand new, state-of-the art aircraft, or an older, less sophisticated tin can with a few million kms under its wings?

    It’s the same when you think about the IT system you’re relying on to store your valuable school data and keep your operations running. The older the system and software, the more gaps in the security standards.

    It’s also true that the longer hackers have access to a certain system, the easier it is for them to identify how to circumvent any security measures.

    Older technology can’t recognise new threats

    Just because your current software and hardware still looks like it’s working, it’s unlikely that it’s able to offer you the protection you need against newer, more sophisticated threats.

    Every time a hack is exposed, hackers learn how not to do it.

    This is extrapolated by the fact that technology is an ever-developing part of our lives and new security measures may not be compatible with older machines and programs.

    Legacy platforms can’t act as quickly to stop threats

    While older systems will have some security functions and be able to monitor and track threats once they happen, they won’t have the kind of up-to-date intrusion detection facilities that newer platforms can offer.

    These new functions not only pinpoint a threat but can stop it before it crosses into your network, preventing costly and time-consuming damage and disruption.

    Costly crashes and lost time

    Computers crashing feels like an outdated concept today, with sophisticated systems simply not getting overloaded as easily as they once did.

    However, old models and outdated software are more likely to crash, resulting in lost data and valuable time.

    Communication between both school and parents, and within the school itself, is essential to keeping the cogs turning. The longer, and more frequent, system crashes are, the more learning time is lost and communications missed.

    Why your system needs an IT upgrade

    Even thinking about updating your school IT system might feel like too big a job to tackle. But it doesn’t have to be hard – or costly.

    For one thing, you don’t have to do everything at once.

    Assessing what your school needs most, where systems could be working better, and teachers and students need greater support, will clarify what areas are most in need of an upgrade.

    Even making small changes, where you are able to see the benefits quickly, can help make the changes easier.

    Upgrading your school IT also doesn’t have to blow all of your budgets. Good, reliable, reputable vendors don’t mean huge bills, and some platform features are free to eligible schools.

    School security and safety is, and should be, a primary issue. A reliable, up-to-date IT system will save time and money, and allow your school to focus on successful outcomes.